Back to Calyxa's Bryce Tutorials
 |
Calyxa's New Brycean Trees
A Tutorial for Bryce versions 3 and later
|
|
The more I worked on a tree as an example for this tutorial,
the more complex the whole thing kept getting. Rather than
try to explain in gory detail all that went on in the Deep
Texture Editor, I've decided to provide a copy of the branch
object for you to download and study. There are notes below
concerning some of the more important Deep Texture Editor
tricks involved in the branch material. If you are already
familiar with the Deep Texture Editor, you may find enough
information here without downloading the sample branch.
You must have updated to Bryce 3.1 or have Bryce 4
in order to load the branch correctly.
Download the sample branch (46K zip)
The sample branch is a Bryce object (.obp) file. To use it,
go into the Object Presets dialog (click the triangle next to
'Create') and then import the file 'calybranch.obp' into the
category of your choice. Once the branch has been imported,
you can create one and add it to a Bryce scene. Then, go into
the Material Lab to study the branch material in depth.
This tutorial concentrates on how the branch was made, starting
with a symmetrical lattice object.
|
Step One - Draw a Branch
|

|
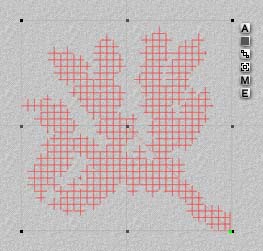
Create a symmetrical lattice object and go into the
Terrain Editor. Draw a branch shape in shades of grey.
To the left is the g2h map as is used in the sample branch.
The important points to keep in mind for creating your
own branch are:
- A dark grey 'trunk' of the branch should extend all the
way into one corner of the terrain editor canvas.
- Change the terrain grid to 256 for drawing details, then
after it is drawn, change it back down to 128 or even 64.
Detail in the trunk part of the branch will break down around
32 grid, but the trees in my
Golden Tree Walkway v.2 use 32 grid lattices.
- It is OK to have abrupt transitions between shades of
grey.
- Finish it off with lots of white leafy protrusions on
the non-trunk edges.
|
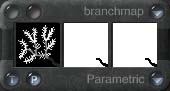
Step Two - Prepare a Branch Mask
|

|
This is the same branch mask as is used in the sample branch.
The easiest way to make the branch mask is to copy and paste
the branch g2h into a photoshop document, then use the magic
wand tool to select the dark grey 'trunk' portion of your
branch. The branch mask maps out which parts of your branch
get the treebark part of the branch material.
|
Step Three - The Branch Material
|
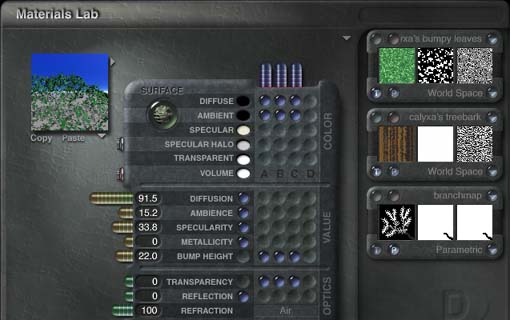
This is where things get really hairy. Go into the material lab.
If you're playing along with the sample branch, notice that ABC
mode is used for Diffuse, Ambient, Bump Height and Transparency.
You may want to review my tutorial
The ABCs of Naturalistic
Marbles for more on ABC mode.
Here's the material lab with the final branch material
in it. I'll talk about each component separately below, starting with
C and working backwards to A.
|
|
Step Three - sub one - Texture C
|
|
Component C is a picture texture and uses the branch mask you
prepared above in Step Two. The only part that really matters
is what ends up in the center preview swatch. I noticed that
while I was in photoshop, my alpha channel was white where the
branch was and black everywhere else, but when I imported it
into Bryce, it inverted itself and ended up black where the
branch was and white everywhere else.
The important points to notice here are:
- The mask should contain only black and white, no shades
of grey.
- Where the mask is white, texture A is applied. Where
the mask is black, texture B is applied.
- The mapping should be 'parametric' by default because it
is from a picture source.
- If you want to use this material on your own branch,
simply replace the picture in texture C with pictures
derived from the shape of your branch g2h.
|
Step Three - sub two - Texture B
|
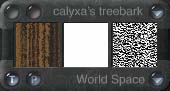 More on the DTE for texture B
|
Again, it is the center swatch that concerns us the most
here.
Using ABC mode to drive transparency first tells Bryce to
use the information in Texture C to decide where the final
material should use transparency from texture A and where
it should use transparency from texture B. But the parts
of the object which are to use texture B shouldn't be
transparent at all, so the alpha information in texture B
needs to be all white.
|
Step Three - sub three - Texture A
|
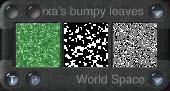 More on the DTE for texture A
|
Once more, it is the center swatch that does the work
This texture creates the leaves, so the idea is to make
discreet white areas in a black background. It is also
important to make sure the mapping is 'world space.'
This way there can be large and small copies of the same
branch to make up one tree and all the leaves will be
a uniform size (as opposed to having large leaves
on the large branches and tiny leaves on the tiny
branches).
|
Step Four - Branch Origin Point
|
|
Wow, after all that material stuff, this step will be
really easy!
Exit out of the DTE and material lab when your head
is spinning too much from looking at the sample branch
material. Bring up the object attributes dialog for
your branch. I like to change the name of the lattice
to 'branch 1' at this stage, but what we're really
here for is to turn on the 'show object origin handle'.
After you've turned on the origin handle, you'll want
to move it from the center of the lattice to the branch
end which went off the terrain editor canvas at a corner.
So far, we have not moved the lattice object at all,
so this is best accomplished in top view.
If you haven't used object origin handles before, it is
the bright green dot shown in the picture to left. The
picture also shows where the origin handle should be
after it is moved to the 'trunk' end of the branch. This
is also how the origin handle for the sample branch will
look, though I believe the sample branch has been rotated.
|
Step Five - Build a Tree
|
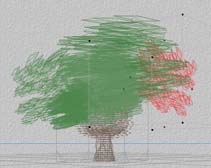
|
This branch is a lot denser than others I had worked
with before so it took fewer lattice branches to
make a decent looking tree. The wireframe tree to
the left consists of 8 symmetrical lattice objects all
at 128 grid. Two of those are for the trunk and they
are a boolean 'miracle tree' group. The other six
branches are all duplicates of the sample branch, stretched
to a variety of sizes.
Switch between 'World Space' and 'Object Space' with
the editing tools as the branch is rotated in space to
put the branches at different angles. The branch will
rotate about the origin handle. The 'trunk' portion
of the branch can be moved to touch the trunk and any
rotation will leave the origin point alone still within
or touching the trunk.
|
For some earlier trees I made with similar methods,
the branches were not as dense (fewer little leafy white
protrusions). When I made trees from those branches,
I multi-replicated the first branch five more times
rotating around the Y axis at 60 degree increments.
Then, make a group of those six branches, copy and
paste it, then use the page-up key to raise the new
branches above the old. Often I'd make one more set
of six branches. Then I'd use the randomize tool
set to '3D Size, Disperse, Rotate' a few times after
which I'd have to re-collect my branches to a clear
area of the scene file. But that would give me several
different sizes of branch which assembled back into a
tree fairly quickly because the visible origin point
makes it easy to line up the branch and trunk.
|
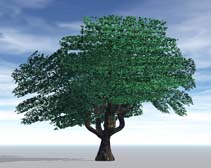
The Rendered Tree
|
|---|
|
Back to Calyxa's Bryce Tutorials
|