Back to Calyxa's Bryce Tutorials
 |
The ABCs of Naturalistic Marbles
A Tutorial for Bryce versions 3 and later
|
|
Ever since I fully grokked the ABC mode of the Materials Lab, I've
been having loads of fun with making new textures. Polished marbled
stone was what I was after, and this technique makes the mundane preset
marbles much jazzier (and unfortunately, slower to render...).
|
| |
|---|
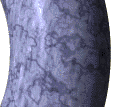 |
This is the preset material Marble, Blue-Purple found in
the Rocks&Stones category. It looks pretty good, but it
could be made better.
|
| |
|---|
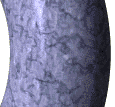 |
Here's the tweaked version. It doesn't look all that different,
but believe me, there are some powerful tools at work here which will open
new pathways in your material tweakings.
|
| |
|---|
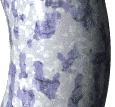 |
Only one change done at the Material Lab level was needed to change the
second material into this one here. Once you've set up a material using
the ABC mode, this type of tweak is quite simple.
|
| |
|---|
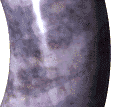 |
This one gets a little further off my track, but you'll be able to make
materials like this based on the information in this tutorial without
ever touching the deep texture editor!
|
|
Here's how it is all done...
I like to start with a preset marble-like texture because that gives me
some reasonable optical properties, and an interesting texture to work with.
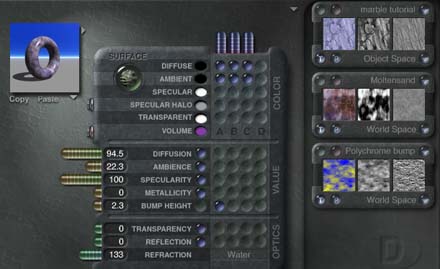
This is the Material Lab just after selecting that Marble, Blue-Purple
out of the material preset Rocks&Stones category.
|
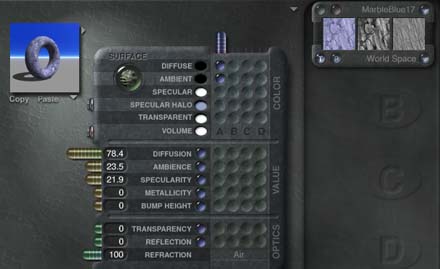 |
The first thing we're going to do is add the preset texture in
the material's A component to the Texture Library. The short story
there is: Shift-click the button which brings up the menu shown in
Figure 2. This brings up the Texture Library dialog, which is a graphical
representation of your texture presets. It works the same way as
any other presets dialog.
I also have a somewhat longer, more confusing explanation of how to
access the texture library. See my Secret Texture
Library tutorial for more information. You'll also find there an
explanation on the differences between a texture and a material.
The next thing we're going to do is control-click in the C column for both
diffuse color and ambient color. Page 224 in the Bryce3D manual has a brief
explanation of ABC mode. Susan Kitchens covers ABC mode in Real World Bryce2
on pages 344-348.
|
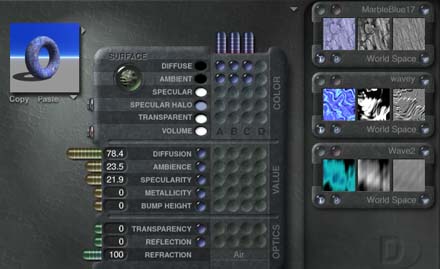 |
|
That'll give you random textures in the B and C slots, which could give you some
interesting results or some ugly results... but don't worry, we're changing both.
For the B slot, select the copy of texture A that you stashed in the texture library.
This makes A and B exactly the same, but they won't be for long. In either the
A or B slot, bring up the 'shallow texture editor' (done with the blue button next
to the pink one for the deep texture editor). In here, twist around a few angles,
slide the texture along an axis or two and maybe stretch or compress it along a
few different axes. The idea here is to make a texture that's the same coloring
and same base texture, but just different enough to 'break up' the evenness of
the preset.
|
 |
|
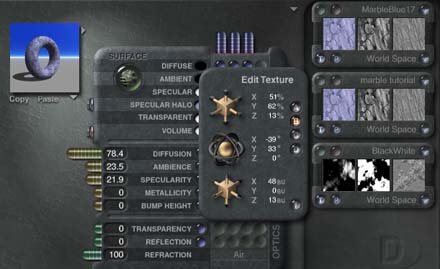
I also changed the texture in the C slot. I don't want to get into the deep texture
editor here, but I do want to say that the only part of texture C that matters is the
middle thumbnail, the one for 'value.' So, if you decide to go into the deep texture editor
to adjust the effect of the C slot, you'll want to turn off any color or bump and only use the value.
(In fact, beware of textures which use black and white in their color channels! The
sample you see in the deep texture editor may look totally different in the middle
texture swatch back in the Material Lab if you have the confusing situation of black
and white in the color channel...)
Wherever the value of C is black, texture A is applied. Wherever the value of C is
white, texture B is applied. For breaking up the monotony of a preset marble, I like
to use the BlackWhite texture preset in the Basic category. The Red
Fractal preset also works quite well for this.
Remember up a the top of this page when I mentioned only one change was needed to
change the second material into the third material? Here's the Material Lab for
that third material, and the only change was to make Texture A use my 'lightmarble'
texture from my texture library.
|
 |
|
And that fourth material at the top of this page also uses this ABC technique, but
the texture in the C slot, rather than having sharp delimitations between black and
white areas instead smoothly transitions through shades of grey.
|
 |
|
Back to Calyxa's Bryce Tutorials
|