This tutorial covers some basics for using Bryce 4's fractal terrains,
including how to use the tile feature and how to work around the tiling
gap bug.
Section One: Shopping for Fractals
Grid Size
|
Generating fractals can take some time, especially at high resolutions.
So, when you want to browse through the various fractals, do it at a
grid size of 128. You can check out up to 8 different fractals generated
at a 128 grid size in the amount of time it takes to generate a single
1024 grid fractal. The time to worry about increasing the grid size is
after you've found the fractal you want to use.
|
|
The Randoms
After you make sure your grid size is set at 128, the next thing to do
is pop up the fractal menu and pick a fractal other than 'Bryce Classic.'
The 'Bryce Classic' fractal terrain does not use the randoms and it does
not tile. Selecting a new fractal algorithm will activate the randomizers
and all three will be on. They are: Random Extent, Random Position and
Random Character.
By turning these randoms off one at a time and generating several
fractals before turning the next one off, you can zero in on a terrain
you really like. To get the most out of this, it helps to know what
the different Random options are all about.
Note: Although 'Extent' is in the menu before 'Position,' and 'Extent'
is usually the first one I turn off when I'm shopping for fractals, I'm
going to explain 'Position' first because I think the concepts make
more sense in this order.
- Position
Imagine that each fractal algorithm exists as an infinite sheet and
terrains are squares cut from that sheet. Position affects what part
of the fractal the terrain comes from. While some fractals are very
similar throughout, others are vastly different depending on where
you are on the sheet.
|

|

|
|
These three are from the same fractal pattern with only the Position
randomizer turned on. The three terrains all have features that are
about the same size.
|
- Extent
This controls the size of the squares. Another way to think of it is as
controlling the size of the features on each terrain tile. It's feature
size I look for first when I'm generating fractals. Many of the terrains
generated don't have enough detail and others have too much! Once I find
one that is just right, I turn off Random Extent and then look around for
different positions.
|
|
|
|
These three are from the same fractal pattern with only the Extent
randomizer turned on. The third one is zoomed in on the lower left
corner of the first, and the middle one is nearly the same as
the first, zoomed in only slightly.
|
- Character
Some fractal algorithms have more character than others. I usually
leave the Character random for last.

|
|
|
|
These three are from the same fractal pattern with only the Character
randomizer turned on. This particular fractal has a moderate range of
characters. Some have very strong characters and can look completely
different, others don't change much at all.
|
Grid Size Revisited
Once you have a terrain you like and the last 'random' has been
turned off, now is the time to bump up the grid size to at least
512. Generate the high-res terrain and exit the terrain editor.
Section Two: How to Tile
Tiling terrains isn't something that you do after you've been
working on a complex scene for days. Setting up a grid of tiled
terrains is the first thing to be done for a new scene. After the
grid is established, then you look around the grid looking for
interesting scenes.
Start with a new scene file. Create a terrain object. Do not resize
the terrain object!
Go into the terrain editor and shop for fractals as described above.
When you have exited the terrain editor after generating a high-res
terrain, duplicate it (command/control D) and switch to top view (the
keyboard shortcut for top view is simply a 2).
Use the arrow keys to nudge the terrain. It does not matter which
arrow key you use, as long as you remember which one you used. To
move the duplicate completely off to the side of the original, it
will take 16 arrow key presses (or 8 shift-arrows).
Top view after nudging second terrain into place
Note that when you are in top view, the direction an object moves
when you nudge it with the arrow keys is the direction it moves on
the screen. These directions also correspond with the common map
directions.
To put the proper section of the fractal onto the duplicate terrain,
go into the terrain editor and select one of the tile options based
on the arrow key used to nudge the duplicate. That is, if the up arrow
key was used to move the duplicate, turn on the 'Tile North' menu
option.
| Arrow Key | Tile Option |
Compass |
| Up | Tile North |
|
| Down | Tile South |
| Left | Tile West |
| Right | Tile East |
Once you've selected the direction to tile, double-check that all
the randoms are off. They all should already be off if you followed
the shopping procedure above. Click the fractal button to generate
and exit the terrain editor.
Now you'll want to repeat the process of duplicating the terrain,
nudging it with the arrow keys and going back into the terrain editor
to generate the next tile. Note that you can tile terrains in a
variety of patterns. The only important thing is that you remember
which arrow key you used to nudge the duplicate and make sure the
tiling direction matches.
|
|
|
Two example tiling patterns. Others are possible.
The right-hand one can be continued in an ever-expanding spiral.
|
Terrain tiling is something that has to be done all at once. There's
no way to go back later and add new tiles onto a block of tiled
terrains. Once you've used the terrain editor for anything else other
than making your tiles, it "forgets" the fractal you're working with.
Section Three: Fixing the Gaps
Earlier, we imagined that the fractal algorithm was an infinite sheet
and terrains are squares cut out of that sheet. That's not quite how it
works. The squares get cut out OK, but then they are applied to terrain
objects which are slightly bigger than the squares. The method below
will enable you to see that difference between the square and the
terrain object.
Enlarging the Problem
Once you've laid out your tiles, select all the terrains and group them.
Then, type about three asterisks, ***. With each asterisk you type, the
group of terrains will double in size. After the terrain group is expanded,
click the arrow to bring the group to ground level and then ungroup it. Not
only have the terrains increased greatly in size, but so have the gaps
between them, and now they're big enough so that you can do something about
them.
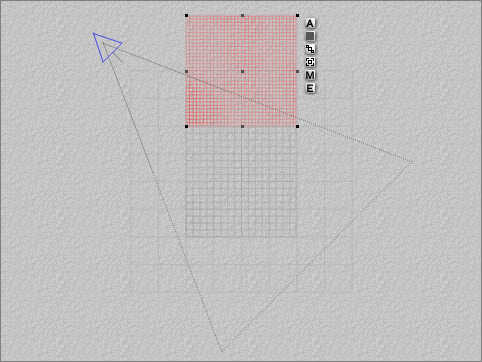
Keyboard Zooming
Like the tiling itself, the gap fixing can be done in any order as long as
it is consistant. I like to start with the first two terrains created, but
any two adjacent terrains can be selected. Work in top view. Use the plus
key, +, to zoom in. By using the keyboard zoom, the wireframe display will
zoom in to the center of the selected object(s). And, since we have two
adjacent terrains selected, this will give you a close-up on the center of
the gap between the two. Hit that plus key until it doesn't zoom any more
(or as long as you can still see the gap, depending on how many asterisks
you typed when enlarging the group).
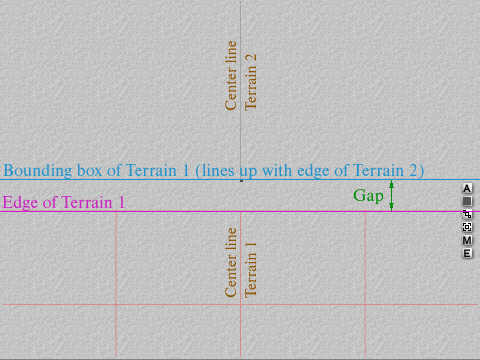
Note how you can not only see the gap between the terrains, but you can
also see how the bounding box of the selected terrain does not correspond
with the edge of the terrain object. This is why the gaps are there!
Select Terrains via Menu
De-select one of the terrains and drag the other terrain so their edges
line up. You'll also have the center line of each terrain showing to help
in lining them up. While the second terrain is still selected, add the
third terrain to the selection by holding the shift key and popping up
the 'select terrains' menu. Unless you renamed every terrain as it was
duplicated in the tiling process, the menu should list each terrain numbered
in the order it was created. Selecting terrains 2 and 3 will select adjacent
terrains. You want to do this via the menus instead of zooming out and here's
why - once you've selected the next pair of terrains, typing the plus key will
simply shift the top view to focus on their gap. That's one keystroke, versus a
bunch of -'s to zoom out enough to see the next terrain to select, followed by
a bunch of +'s to zoom in.
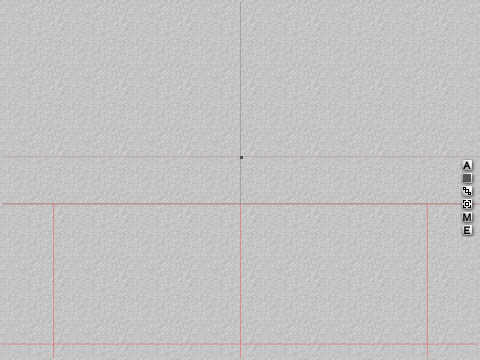
Here's the same scene as the previous screenshot, zoomed in one more time
and with the gap between the two terrains closed up. You can see the bounding
box of the selected terrain overlapping the edge of the other terrain, but
the two actual terrain edges are now lined up.
Repeat the process by de-selecting terrain 2 and dragging terrain 3 into
place. You may want to lock the terrains as each one's position is fine
tuned. Or, if you want to doubly insure your gap-fixing, after you've adjusted
all the terrains, group them and hit the slash key, /, once. This will cut
the size of the group in half (and will halve the size of any remaining gap!).