This tutorial is only for Bryce 4. If you want to make rainbows with
Bryce 3, then please refer to Peter Sharpe's excellent tutorial,
Rainbows by Numbers.
B3/B4 Sun Positioning Compared
In Bryce 3, the sun position (and thus the rainbow position) is controlled
by three values: X, Y and Z. Bryce 4 uses a different (and more realistic!)
system, altitude and azimuth.
Sun altitude in Bryce 4 corresponds to the sun's Y coordinate in Bryce 3 --
almost. In Bryce 3, setting the sun's Y coordinate to 0 is equivalent to
setting the sun's altitude coordinate to 90 in Bryce 4; they both result
with the sun at "high noon." Similiarly, setting Bryce 3's Y
coordinate to 90 and setting Bryce 4's sun altitude to 0 both result in
the sun being exactly on the horizon.
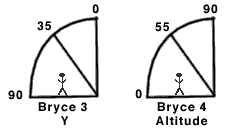
Above is a diagram of a cross-section of the sky, with a
poor stick figure standing on the ground and the sky arcing above. In
Bryce 4, Altitude is measured from 0 at the horizon to 90 directly above
at "high noon".
Below is a map-like diagram of the horizon. If the stick figure was in
these, we'd be looking down at the top of its head. Bryce 4's usage of
a compass to locate the sun on the horizon is far more "real
world" than the two coordinate (x,z) system of Bryce 3.
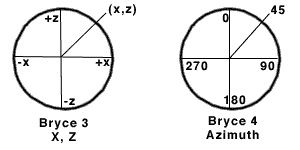
Azimuth is a value between 0 and 360 and represents where the sun is along
the horizon. In the real world, we have only one horizon, but Bryce has
two. One of Bryce's horizons is modelled after the "real world"
and the other is arbitrarily determined by the camera. The two-horizon
issue applies in all versions of Bryce, regardless of whether the sun is
positioned using X, Y, Z coordinates or Altitude and Azimuth coordinates.
The Two Horizon Flavors
The option controlling which horizon gets used is link sun to view.
By default, link sun to view is on. This is Bryce's special horizon,
it is relative to the camera, not to the "world." With link
sun to view on, an azimuth of 0 puts the sun directly in front of the
camera and an azimuth of 180 will put the sun directly behind it. The
red circle and angle markers in the "top view" diagram below
show the link sun to view azimuth coordinates.
With link sun to view off (non-default, used for animations mostly), the
horizon model is like the real world, and an azimuth of 0 puts the sun
at Bryce's "north." When you view your scene from top view
(hit the '2' on your keyboard to quickly switch to top view), the
world is laid out as shown by the green circle and directions.
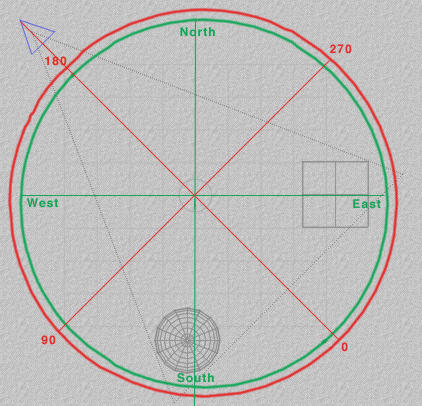
A Bryce scene in Top View, showing the World coodinate
system (green), and the link sun to view coordinate system (red).
Which coordinate system your horizon uses depends on whether the link
sun to view option is on or off. Below is the rendered image of the
scene file shown in top view.
Finally, some Rainbows!
Now that we've gotten that out of the way, let's dive in to some specifics.
Peter's tutorial starts out by choosing the second sky preset, 'A Midsummer
Afternoon' and then sets the haze to 100.
In our case, choose that same preset, but leave the Haze as it is. What
we really need to change to get this working right is the Cloud Height.
This preset has a default Cloud Height of 3. We need to set it to at least
30 in order to see the rainbow clearly.
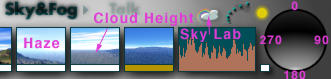
Part of the Sky&Fog palette showing the Haze control,
which we're leaving alone and the Cloud Height control, which should be set
to at least 30. Also indicated is the Cloud icon which opens the Sky Lab
(which is where the rainbow on/off switch is located) and some azimuth
numbers around the sun trackball - which only apply if link sun to view
is turned on.
The Rainbow on/off switch is in the sky lab on the
Atmosphere tab. Turn
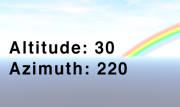
the rainbow on and set the Opacity to 100. The sun's Altitude and Azimuth
values are in the lower right of the Sky Lab and are visible on all three
tabs. Link sun to view should be on by default, leave it that way
for now.
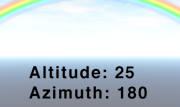
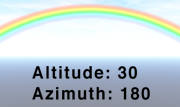
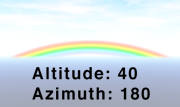
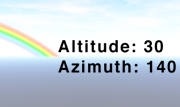
Rainbows depend on the sun position in an inverse relationship. That is,
if you move the sun lower on the horizon, the rainbow will rise in the sky.
If you move the sun to the left, the rainbow will move to the right.
Positioning With Link Sun To View Off
Altitude behaves the same way regardless of whether link sun to view
is on or off. Once the azimuth is figured out, tweaking the altitude will
put the rainbow in its final position. There's some very simple math that
can pin down the exact azimuth to use when link sun to view needs
to be off (an animation, for example).
The azimuth needs to position the sun relative to the world.
The first thing to find out is how the camera is positioned relative to
the world and from that derive where to place the sun so that
a rainbow can be seen through the camera position.
Switch to top view and select your camera. Open the object attributes
dialog for the camera and note the Y rotation value. For a brand new default
scene, the camera's Y rotation is 135. To get the Azimuth value that will
make a rainbow appear in the default scene with link sun to view off,
simply add 180 to the camera's Y rotation: 135 + 180 = 315 and enter the
result as the azimith.
Note: Be sure to use Camera view not Director's view when rendering.
Unfortunately, it isn't always that easy. After roaming around your scene
for a while, it's possible for the camera to get "wound up" and
have a Y rotation much larger than 360 (or much smaller than -360!), so you
must simplify the angle. I'm no math whiz, so what I do is type the Y
rotation value into a calculator and then either add or subtract 360 (depending
on whether my angle was too small or too large) repeatedly until the value
I get is between 0 and 360. While the camera's Y rotation value can be
outside of the 0 to 360 range, the value for the sun's azimuth is constrained
to that range.
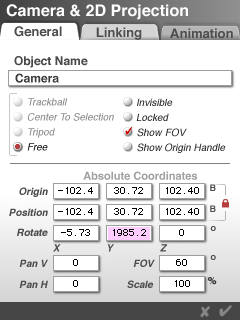
For the value shown in the camera attributes dialog above, 1985.2, I subtracted
360 five times and arrived at a value of 185.2. That's the corrected camera
rotation relative to the world. To position the sun directly
behind that camera, the azimuth should be 180 degrees opposed to the camera's
Y rotation. If that corrected rotation is between 0 and 180, add 180 to get
the azimuth. If the corrected rotation is between 180 and 360, subtract 180.
In this case, the azimuth was set to 5.2.