Back to Calyxa's Bryce Tutorials
 |
Swooping Brycean Roads
A Tutorial for Bryce versions 3 and later
|
|
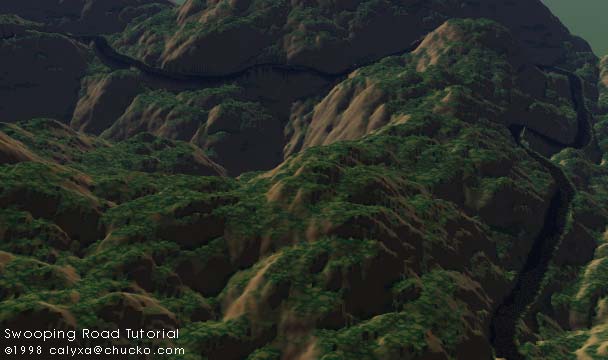
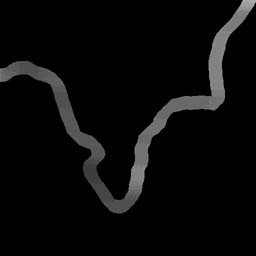
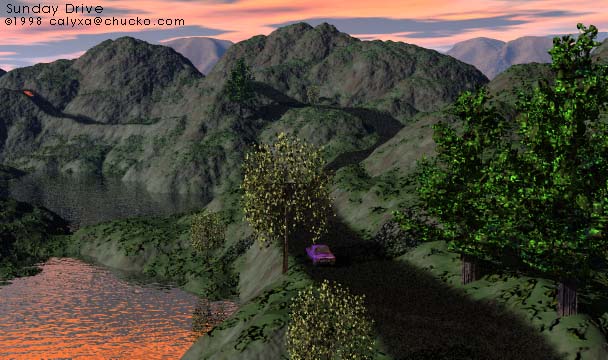
This image is one 512 grid terrain.
This technique can make roads which swoop over your Bryce terrains. If you
have not done so already, you may wish to review the
previous lesson on making flat roads. The start
and end of the procedure for making swooping roads is the same as for making
flat roads.
|
Step 1 - do steps 1 and 2 from the previous lesson
|
Prepare a Photoshop document with your terrain in the RGB channels,
a blank alpha channel, and a posterized copy of the terrain in a
fifth channel. You may also want to keep a backup copy of the
original g2h in a sixth channel.
In the previous lesson, I complained about Photoshop's
posterize 'filter.' What I was really looking at was Filters->Gallery
Effects Vol 1->Poster Edges, which isn't right. When I discovered
Photoshop's Image->Map->Posterize... dialog, I knew I had found
the right tool.
|

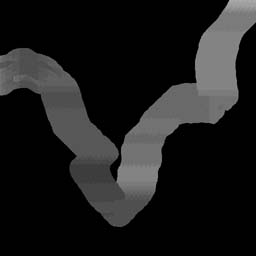
Terrain posterized to about 30 levels.
|
Step 2 - select your roadpath
|
You can pretty much put your roadpath anywhere you want. If you
try to not cross too many contours, especially those which are close
together, you'll have better results.
|
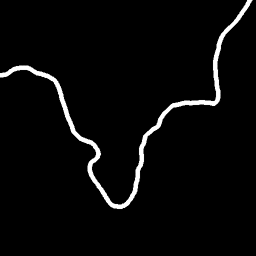
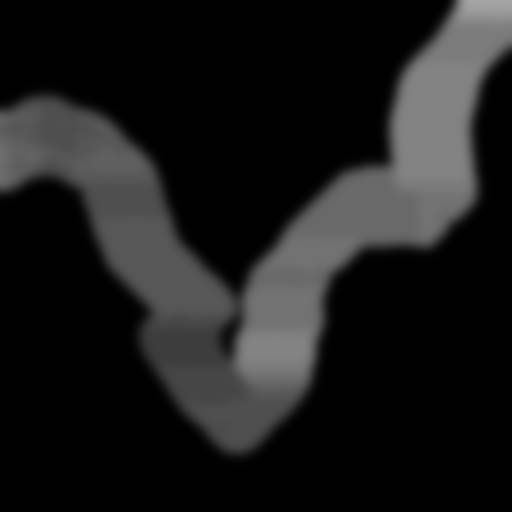
Roadpath selection saved as alpha channel.
|
Step 3 - 'fix' posterization along roadpath
|
Switch to the poster channel and load the selection from the
alpha channel. Copy.
Create a new channel, this will be your 'working' channel. With
the roadpath selection still active, paste in the copy from the
posterized layer. Zoom in. This is the first tedious part, but
it doesn't take too long.
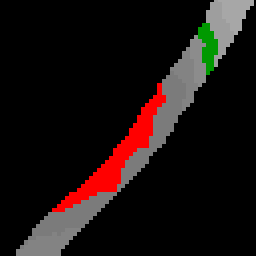
On the right are before and after images of a section of the posterized
roadbed. The red area was the next darker poster level, but because
this area does not extend all the way across the road, it gets filled in
with the color of the adjacent poster level. If the area had been the
next lighter poster level, again it would have been filled in with the
adjacent grey. Filling in a darker area makes a road fill, filling in
a lighter area makes a road cut.
|
Before
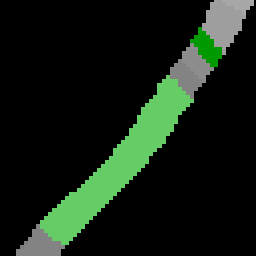
After
|
|
I used the paint bucket with no anti-aliasing and low tolerance to
do these cuts and fills.
Option-click to pick up the color of the adjacent grey, then
fill in the darker (or lighter) 'disconnected' patch (areas like
the one shown in red here).
The green section in the before image shows how even though
the contour lines completely cross the road, they do not cross it
at right angles. A similar green area in the after image shows
how it was adjusted. I used the pencil tool to straighten the
contours.
Proceed along the entire road length sampling
the various poster levels and re-adjusting their angle to the
road. This doesn't have to be too precise, because we're going to
mix it up a little bit in our next tedious step.
I like to save a copy of the fixed posterized road bed
in a spare channel, just in case.
|
Step 4 - prepare working area for blur - part 1
|
You should be on your 'working' channel, with a copy of the fixed
posterized roadpath selected. Copy and paste, then use the arrow
keys to nudge the copy up as many pixels as you can before you start
seeing black in between the copy and the original roadpath. (I go
'til I see the black, then nudge it back the other way a few times).
Re-load the original alpha channel roadpath selection. Paste again.
You want to reload the channel every time before you paste so that
the pasted roadpath goes onto the exact right spot. Nudge the new
copy the opposite way from the first copy, again, as far as you can
without seeing black between the first two and the new copy.
Repeat that yet again for the other two arrow keys - reload the original
roadpath selection, paste, nudge.
The most important bit is to end by loading the selection and pasting
one final copy in the center of this mess where the roadpath belongs.
|
|
Step 5 - prepare working area for blur - part 2
|
In the 'working' channel, select everything that is not black. Save
the selection to yet another new channel. I'll refer to this newest
channel as 'wideroad.'
Repeat what you did in step four, this time using the 'wideroad'
channel as the selection you load. Nudge the copies of the conglomerate
made in step four again as far as they will go without showing black
between the growing road area and the freshly pasted copy.
Again, end by loading the 'wideroad' selection and pasting in a final
copy without any nudging.
|
|
Step 6 - gaussian blur
|
Now that you've carefully put these copies everywhere, it's time to
finally blur it. Use a Gaussian Blur of around 1.5 to 2 pixels. Then
repeat the Gaussian Blur several times until it starts to look smooth.
That'll be at least 10 or 20 times.
Do not try to skip blurring several times by making the initial blur
much wider in pixels, because that'll incorporate some of the black which
we're carefully avoiding by making all those copies of the roadbed, and
that will make your road cut severely into the terrain.
|
|
Step 7 - carve the road
|
Load your original roadpath from the alpha channel while viewing your
'working' blurred layer. Copy. Switch back to your original terrain.
Paste.
Your road is carved. Use the texturing information from step six of
the previous tutorial to have the road paved with a different material
than the surrounding mountain.
Note that it's kind of hard to see the road here in this terrian map.
That's a good thing. If you can see your road too clearly when you
get to this step, your road will be making some very deep cuts and/or
some very tall fills.
|
|
|
|
|
Back to Calyxa's Bryce Tutorials
|